# Plugin
# html-webpack-plugin
我们使用固定的模板,在每次打包的时候自动生成一个 index.html 文件,并且它会自动帮我们引入我们打包后的 .js 文件。
安装
npm install --save-dev html-webpack-plugin
webpack.config.js
const path = require('path');
const HtmlWebpackPlugin = require('html-webpack-plugin');

module.exports = {
  mode: 'development',
  entry: './src/index.js',
  output: {
    filename: 'main.js',
    path: path.resolve(__dirname, 'dist')
  },
  plugins: [new HtmlWebpackPlugin()]
}
src/index.js
console.log(1);
src/index.html
<html>
  <head>
    <meta charset="UTF-8" />
    <title>webpack App</title>
  </head>
  <body>
    <div id="root"></div>
  </body>
</html>
打包后,可以看到 dist 目录下自动生成了一个 html 文件,文件内容如下:
dist/index.html
<!DOCTYPE html>
<html>
  <head>
    <meta charset="utf-8">
    <title>Webpack App</title>
  <meta name="viewport" content="width=device-width, initial-scale=1"><script defer src="main.js"></script></head>
  <body>
  </body>
</html>
这个html文件中自动引入了我们打包后的 JS 文件。
以上是 html-webpack-plugin 初步使用,后续会介绍它更高级的使用。
# clean-webpack-plugin
这个插件的主要作用是在运行打包命令前,删除 dist 目录中之前生成的文件,以保证 dist 目录里是最新的文件。
安装
npm install --save-dev clean-webpack-plugin
webpack.config.js
const path = require('path');
const HtmlWebpackPlugin = require('html-webpack-plugin');
const { CleanWebpackPlugin } = require('clean-webpack-plugin');

module.exports = {
  mode: 'development',
  entry: './src/index.js',
  output: {
    filename: 'main.js',
    path: path.resolve(__dirname, 'dist')
  },
  plugins: [
    new HtmlWebpackPlugin(),
    new CleanWebpackPlugin()
  ]
}
随便在 dist 目录下新建一个文件,然后运行打包命令 npx webpack 进行打包,可以看到刚随便新建的文件被删除了。
这里只介绍了两种我们最最常用的两个 plugin 更多 plugin 请查阅官方文档 (opens new window) 。
# Entry和Output
# 多文件入口的配置
src/index.js
console.log('index');
src/main.js
console.log('main');
webpack.config.js
const path = require('path');
const HtmlWebpackPlugin = require('html-webpack-plugin');
const { CleanWebpackPlugin } = require('clean-webpack-plugin');

module.exports = {
  mode: 'development',
  entry: {
    index: './src/index.js',
    main: './src/main.js'
  },
  output: {
    filename: '[name].js',
    path: path.resolve(__dirname, 'dist')
  },
  plugins: [
    new HtmlWebpackPlugin(),
    new CleanWebpackPlugin()
  ]
}
执行打包命令后,发现 dist 目录下生成了 index.js 和 main.js 两个文件,index.html 文件中自动引入了这两个文件。
# 使用CDN
const path = require('path');
const HtmlWebpackPlugin = require('html-webpack-plugin');
const { CleanWebpackPlugin } = require('clean-webpack-plugin');

module.exports = {
  mode: 'development',
  entry: {
    index: './src/index.js',
    main: './src/main.js'
  },
  output: {
    // CND 地址
    publicPath: '//cdn.bootcdn.net',
    filename: '[name].js',
    path: path.resolve(__dirname, 'dist')
  },
  plugins: [
    new HtmlWebpackPlugin(),
    new CleanWebpackPlugin()
  ]
}
打包后的文件 dist/index.html
<!DOCTYPE html>
<html>
  <head>
    <meta charset="utf-8">
    <title>Webpack App</title>
  <meta name="viewport" content="width=device-width, initial-scale=1">
  <script defer src="//cdn.bootcdn.net/index.js"></script>
  <script defer src="//cdn.bootcdn.net/main.js"></script>
  </head>
  <body>
  </body>
</html>
# SourceMap
它是一种映射关系,它映射了打包后的代码和源代码之间的对应关系,一般通过 devtool 来配置
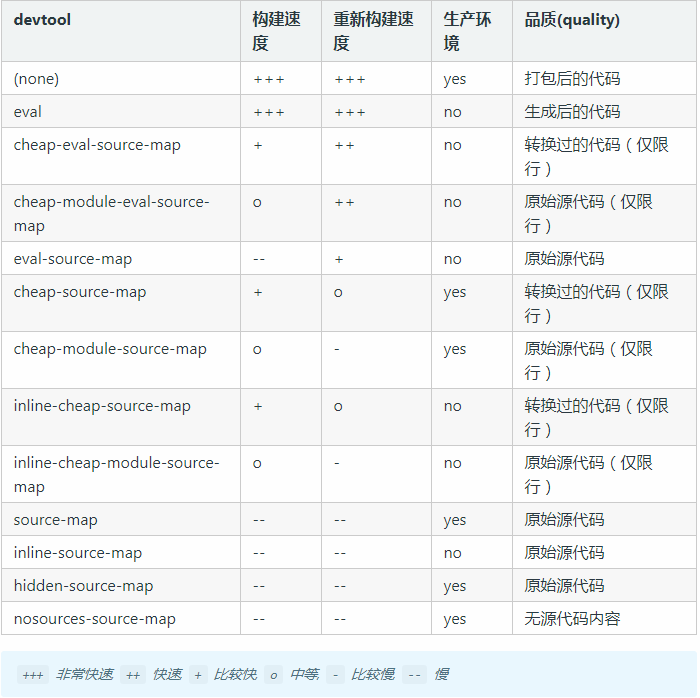
从上图可以看出给 devtool 配置合适的sourcemap 不仅有利于提高打包速度还有利于调试错误、代码维护。
- 开发环境下:推荐使用cheap-module-eval-source-map
Webpack5 中上面这样使用会报错

改为:eval-cheap-module-source-map
const path = require('path');
const HtmlWebpackPlugin = require('html-webpack-plugin');
const { CleanWebpackPlugin } = require('clean-webpack-plugin');

module.exports = {
  mode: 'development',
  devtool: 'eval-cheap-module-source-map',
  entry: {
    index: './src/index.js',
    main: './src/main.js'
  },
  output: {
    publicPath: '//cdn.bootcdn.net',
    filename: '[name].js',
    path: path.resolve(__dirname, 'dist')
  },
  plugins: [
    new HtmlWebpackPlugin(),
    new CleanWebpackPlugin()
  ]
}
- 生产环境下:推荐使用cheap-module-source-map
# 自动打包
在前面我们修改文件后想要看到效果必须执行两个操作
- 重新运行打包命令
- 刷新浏览器
这样的操作好烦人,有没有什么当我们修改文件后自动打包、自动刷新浏览器的方法呢?
# --watch
src/index.js
const root = document.getElementById('root')
const div = document.createElement('div')
div.textContent = 'hello'

root.appendChild(div)
webpack.config.js
const path = require('path');
const HtmlWebpackPlugin = require('html-webpack-plugin');
const { CleanWebpackPlugin } = require('clean-webpack-plugin');

module.exports = {
  mode: 'development',
  devtool: 'eval-cheap-module-source-map',
  entry: './src/index.js',
  output: {
    filename: '[name].js',
    path: path.resolve(__dirname, 'dist')
  },
  plugins: [
    new HtmlWebpackPlugin({
      template: 'src/index.html'
    }),
    new CleanWebpackPlugin()
  ]
}
在终端执行如下命令:
npx webapck --watch
当我们再修改 index.js 文件时,就会自动打包了,但是不会自动刷新浏览器。
# webpack-dev-server
安装
npm install --save-dev webpack-dev-server
webpack.config.js
const path = require('path');
const HtmlWebpackPlugin = require('html-webpack-plugin');
const { CleanWebpackPlugin } = require('clean-webpack-plugin');

module.exports = {
  mode: 'development',
  devtool: 'eval-cheap-module-source-map',
  entry: './src/index.js',
  output: {
    filename: '[name].js',
    path: path.resolve(__dirname, 'dist')
  },
  // 如果不指定,不会自动刷新浏览器
  target: 'web',
  devServer: {
    contentBase: './dist',
    // 指定使用的端口号
    port: 8085,
    // 是否自动打开浏览器
    open: true
  },
  plugins: [
    new HtmlWebpackPlugin({
      template: 'src/index.html'
    }),
    new CleanWebpackPlugin()
  ]
}
当我们像上面这样配置完成之后,当我们再次修改 index.js 文件后,不但会被自动打包,还会自动刷新浏览器。
# 热更新(HMR)
src/number.js
export function displayNum() {
  const num = document.createElement('div')
  num.setAttribute('id', 'num')
  num.textContent = '1'
  document.body.appendChild(num)
}
src/createInput.js
export function createInput() {
	const input = document.createElement('input');
	document.body.appendChild(input);
}
src/index.js
import './index.scss'
import { displayNum } from './number'
import { createInput } from './createInput'
createInput()
displayNum()
启动项目后,在输入框随意输入些内容

当我们将 1 修改为 11 时,虽然页面变化了,但是我们在输入框中输入的内容也没了。这样明显不合适,有什么办法既可以修改数字还能保持输入框的内容呢?这时我们可以使用模块热替换。
模块热替换(HMR - hot module replacement)功能会在应用程序运行过程中,替换、添加或删除 模块,而无需重新加载整个页面。主要是通过以下几种方式,来显著加快开发速度:
- 保留在完全重新加载页面期间丢失的应用程序状态。
- 只更新变更内容,以节省宝贵的开发时间。
- 在源代码中 CSS/JS 产生修改时,会立刻在浏览器中进行更新,这几乎相当于在浏览器 devtools 直接更改样式。
const path = require('path');
const webpack = require('webpack')
const HtmlWebpackPlugin = require('html-webpack-plugin');
const { CleanWebpackPlugin } = require('clean-webpack-plugin');

module.exports = {
  mode: 'development',
  devtool: 'eval-cheap-module-source-map',
  entry: './src/index.js',
  output: {
    filename: '[name].js',
    path: path.resolve(__dirname, 'dist')
  },
  target: 'web',
  devServer: {
    contentBase: './dist',
    port: 8085,
    open: true,
    hot: true,
    hotOnly: true
  },
  plugins: [
    new HtmlWebpackPlugin({
      template: 'src/index.html'
    }),
    new CleanWebpackPlugin(),
    new webpack.HotModuleReplacementPlugin()
  ]
}不。
# JS热更新
对上述 index.js 文件做如下修改,当我们再次启动项目,修改 number.js 中值的时候,输入框中的内容就不会被清除掉了。
src/index.js
import './index.scss'
import { displayNum } from './number'
import { createInput } from './createInput'
createInput()
displayNum()

if (module.hot) {
  module.hot.accept('./number.js', function() {
    document.body.removeChild(document.getElementById('num'))
    displayNum()
  })
}
如果浏览器出现如下提示,可以通过取消 webpack.config.js 文件中的 hotOnly: true 来消除。
Ignored an update to unaccepted module ./src/index.js
# CSS热更新
借助于 style-loader,使用模块热替换来加载 CSS 实际上极其简单。此 loader 在幕后使用了 module.hot.accept,在 CSS 依赖模块更新之后,会将其 patch(修补) 到 <style> 标签中。
src/index.scss
body {
  background: blue;
}
src/index.js
import './index.scss'
import { createInput } from './createInput'
createInput()
src/createInput.js
export function createInput() {
	const root = document.getElementById('root');
	const input = document.createElement('input');
	root.appendChild(input);
	console.log(44);
}
webpack.config.js
const path = require('path');
const webpack = require('webpack')
const HtmlWebpackPlugin = require('html-webpack-plugin');
const { CleanWebpackPlugin } = require('clean-webpack-plugin');

module.exports = {
  mode: 'development',
  devtool: 'eval-cheap-module-source-map',
  entry: './src/index.js',
  output: {
    filename: '[name].js',
    path: path.resolve(__dirname, 'dist')
  },
  target: 'web',
  devServer: {
    contentBase: './dist',
    port: 8085,
    open: true,
    hot: true,
    hotOnly: true
  },
  module: {
    rules: [
      {
        test: /\.s[ac]ss$/i,
        use: ["style-loader",
        {
          loader: "css-loader",
          options: {
            modules: true
          }
        },
        "sass-loader", "postcss-loader"],
      }
    ]
  },
  plugins: [
    new HtmlWebpackPlugin({
      template: 'src/index.html'
    }),
    new CleanWebpackPlugin(),
    new webpack.HotModuleReplacementPlugin()
  ]
}
运行 npm start 命令后,在启动的页面的输入空中随便输入点内容

当我们将 index.scss 文件中的样式从蓝色改为红色后,在到浏览器中查看,样式变成了红色,输入框中的内容还在。

# ES6语法
src/index.js
const testES6 = () => {}
注释掉 webpack.config.js 中的 devtool 配置项。终端运行 npx webpack 命令。查看打包后的 JS 文件。
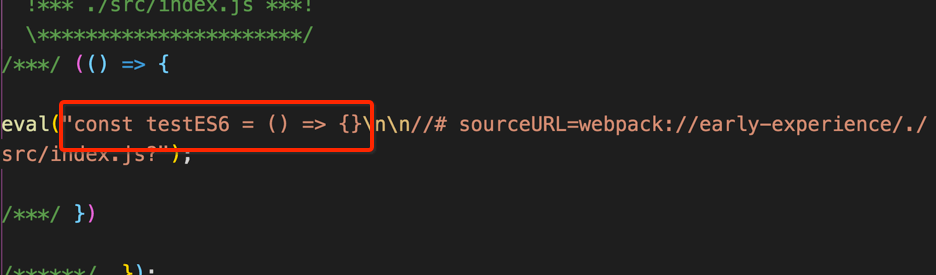
上面我们在代码中使用了 ES6 的箭头函数,打包后的文件也是 ES6 的箭头函数,但是有些浏览器对 ES6 支持的不是很友好,有可能报错,怎么解决这种问题呢?
# 使用 babel-loader 转换ES6代码
安装
npm install -D babel-loader @babel/core @babel/preset-env
配置 webpack.config.js
module: {
  rules: [
    {
      test: /\.m?js$/,
      exclude: /(node_modules|bower_components)/,
      use: {
        loader: 'babel-loader',
        options: {
          presets: ['@babel/preset-env']
        }
      }
    }
  ]
}
查看打包后的输出文件:
dist/main.js
// 省略其他代码
eval("var testES6 = function testES6() {};\n\n//# sourceURL=webpack://early-experience/./src/index.js?");
// 省略其他代码
可以看到箭头函数被转换成了 function 函数。