本文为阅读《深入React技术栈》 (opens new window)、React官方文档 (opens new window)、相关技术博客、工作实践,思考、整理而成,阅读书籍请支持正版。书籍非常不错,强烈推荐。如有侵权,请联系删除相关内容。
# React简介
React 是 Facebook 在 2013 年开源在 GitHub 上的 JavaScript 库。React把用户界面抽象成一个个组件,开发者通过组合这些组件,可以得到功能丰富、可交互的页面。
- 专注视图层
React专注于提供清晰、简洁的视图层解决方案。
- Virtual DOM
在传统开发模式中更新页面需要手动操作DOM,这样不但性能消耗大,代码中充斥着过多的DOM操作也不利于代码的维护。React把真实DOM树转换成了Virtual DOM。当数据发生变化会重新计算Virtual DOM,将新、老VDOM进行对比,对发生变化的部分做批量更新。
- 函数式编程
React把重复构建UI的过程抽象成了组件,在给定参数的情况下约定渲染对应的 UI 界面。React 能充分利用很多函数式方法去减少冗余代码。此外,由于它本身就是简单函数,所以易于测试。
React的特点:
- 声明式设计 − React采用声明范式,可以轻松描述应用。
- 高效 − React通过对DOM的模拟,最大限度地减少与DOM的交互。
- 灵活 − React可以与已知的库或框架很好地配合。
- JSX − JSX 是 JavaScript 语法的扩展。React 开发不一定使用 JSX ,但我们建议使用它。
- 组件 − 通过 React 构建组件,使得代码更加容易得到复用,能够很好的应用在大项目的开发中。
- 单向响应的数据流 − React 实现了单向响应的数据流,从而减少了重复代码,这也是它为什么比传统数据绑定更简单。
无论你现在正在使用什么技术栈,你都可以随时引入 React 来开发新特性,而不需要重写现有代码。React 还可以使用 Node 进行服务器渲染,或使用 React Native 开发原生移动应用。
# JSX语法
JSX是JavaScript语法扩展,用于在React中描述UI呈现。JSX允许我们像写HTML一样编写虚拟DOM。
- 在 JSX 中可以嵌入表达式
在JSX中可以嵌入任何表达式。
const name = 'Josh Perez';
const element = <h1>Hello, {name}</h1>;

ReactDOM.render(
  element,
  document.getElementById('root')
);
- JSX可以用于if 语句和 for 循环的代码块中,可以将 JSX 赋值给变量也可以把 JSX 当作参数传入给函数,以及当做函数返回值返回。
function getGreeting(user) {
  if (user) {
    return <h1>Hello, {formatName(user)}!</h1>;
  }
  return <h1>Hello, Stranger.</h1>;
}
- JSX可以给标签定义属性,属性值为字符串时使用双引号包裹,属性值为变量时使用{}包裹,双引号和{}不能混在一起使用。
const element1 = <div tabIndex="0"></div>;
const element2 = <img src={user.avatarUrl}></img>;
- JSX中可以包含多个子元素
const element = (
  <div>
    <h1>Hello!</h1>
    <h2>Good to see you here.</h2>
  </div>
);
- Babel 会把 JSX 转译成一个名为 React.createElement() 函数调用。
const element = (
  <h1 className="greeting">
    Hello, world!
  </h1>
);
Babel编译后
const element = React.createElement(
  'h1',
  {className: 'greeting'},
  'Hello, world!'
);
上述代码调用React.createElement()后实际上它创建了一个这样的对象
// 注意:这是简化过的结构
const element = {
  type: 'h1',
  props: {
    className: 'greeting',
    children: 'Hello, world!'
  }
};
- JSX可以防止XSS攻击。
如下代码:
<!DOCTYPE html>
<html lang="en">
<head>
  <meta charset="UTF-8">
  <meta name="viewport" content="width=device-width, initial-scale=1.0">
  <title>Document</title>
</head>
<body>
  <p>请您在输入框中输入您要评论的内容</p>
  <input id="input"/>
  <button id="sendBtn">评论</button>
  <div>
    您评论的内容为:
    <p id="content"></p>
  </div>
</body>
<script>
  sendBtn.onclick = function() {
    content.innerHTML = input.value
  }
</script>
</html>
当我们在输入框中输入如下代码
<img src="" onerror="alert('开始攻击!')" />
点击评价按钮,页面会弹出“开始攻击弹窗”,触发恶意代码。
当我们用React模拟相同功能时,则不会弹出”开始攻击弹窗“。这是因为React DOM 在渲染所有输入内容之前,默认会进行转义,所有的内容在渲染之前都被转换成了字符串。
<!DOCTYPE html>
<html>
<head>
<meta charset="UTF-8" />
<title>Hello React!</title>
<script src="https://cdn.staticfile.org/react/16.4.0/umd/react.development.js"></script>
<script src="https://cdn.staticfile.org/react-dom/16.4.0/umd/react-dom.development.js"></script>
<script src="https://cdn.staticfile.org/babel-standalone/6.26.0/babel.min.js"></script>
</head>
<body>

<div id="example"></div>
<script type="text/babel">
class Evaluation extends React.Component {
  constructor(props) {
    super(props);
    this.state = {
		content:'',
		value: ''
	};
  }

  sendEvaluation = () => {
  	this.setState({
		content: this.state.value
	})
  }
  inputVal = (e) => {
  	this.setState({
		value: e.target.value
	})
  }
  render() {
    return (
      <div>
          <p>请您在输入框中输入您要评论的内容</p>
		  <input onBlur={this.inputVal}/>
		  <button onClick={this.sendEvaluation}>发布评论</button>
		  <div>
			您评论的内容为:
			<p id="content">{this.state.content}</p>
		  </div>
      </div>
    );
  }
}

ReactDOM.render(
  <Evaluation />,
  document.getElementById('example')
);
</script>

</body>
</html>
# 编写JSX注意项
- 定义标签时,只允许被一个标签包裹。原因是一个标签会被转译成对应的 React.createElement 调用方法,最外层没有被包裹,无法转译成方法调用。
// 报错
const component1 = <span>name</span><span> value</span>

// 正确
const component2 = <div><span>name</span><span> value</span></div>
- 标签一定要闭合。
- DOM元素首字母小写,组件元素首字母大写。
- 注释,JSX最后被转换成JS,因此可以使用JS中添加注释的方法添加注释,在一个组件的子元素位置使用注释要用 {} 包起来。示例代码如下
const App = (
  <Nav>
    {/* 节点注释 */}
    <Person
      /* 多行
         注释 */
      name={window.isLoggedIn ? window.name : ''}
    />
  </Nav>
);
- DOM 元素的属性是标准规范属性,但有两个例外——class 和 for,因为在JS中这两个都是关键字,需要做转换
- class 属性改为 className;
- for 属性改为 htmlFor。 组件元素的属性是自定义属性,也就是组件所需的参数,在写自定义属性的时候,都由标准写法改为小驼峰写法。
- JSX特有的属性
- 省略 Boolean 属性值会导致 JSX 认为 bool 值设为了 true。
<Checkbox checked={true} /> //等价于
<Checkbox checked />
- 展开属性
const data = { name: 'foo', value: 'bar' };
const component = <Component {...data} />;
- 自定义 HTML 属性
在JSX中,往DOM元素传入自定义属性需要使用
data-前缀
<div data-attr="xxx">content</div>
自定义标签支持任何属性。
<my-component custom-attr="foo" />
- JavaScript 属性表达式
属性值要使用表达式,只要用 {} 替换 "" 即可:
const person = <Person name={window.isLoggedIn ? window.name : ''} />;
// 对应输出
const person = React.createElement(
  Person,
  {name: window.isLoggedIn ? window.name : ''}
);
const content = <Container>{window.isLoggedIn ? <Nav /> : <Login />}</Container>;
// 对应输出
const content = React.createElement(
  Container,
  null,
  window.isLoggedIn ? React.createElement(Nav) : React.createElement(Login)
);
- HTML 转义。React 会将所有要显示到 DOM 的字符串转义,防止 XSS。React 提供了 dangerouslySetInnerHTML 属性。正如其名,它的作用就是避免 React 转义字符。
<div dangerouslySetInnerHTML={{__html: 'cc © 2015'}} />
# React组件
# React组件的构建方法
- React.createClass(React 16后已废弃)
const Text = React.createClass({
  getDefaultProps() {
    return {
      text: 'hello',
    };
  },

  render() {
    const { text } = this.props;

    return (
      <span>{text}</span>
    );
  }
})
- ES6 classes
import React, { Component } from 'react';

class Text extends Component {
  constructor(props) {
    super(props);
  }

  static defaultProps = {
    text: 'hello'
  };

  render() {
    const { text } = this.props;

    return (
      <span>{text}</span>
    );
  }
}
React 的所有组件都继承自顶层类 React.Component。它的定义非常简洁,只是初始化了 React.Component 方法,声明了 props、context、refs 等,并在原型上定义了 setState 和 forceUpdate 方法。
- 无状态函数
const Text = ({ text }) => <span>{text}</span>
无状态组件没有state和生命周期方法,在合适的情况下我们应该使用无状态组件进行开发。因为无状态组件不像上述两种方法在调用时会创建新实例,它创建时始终保持了一个实例,避免了不必要的检查和内存分配,做到了内部优化。
函数组件和类组件有什么不同呢?详见 函数式组件与类组件有何不同? (opens new window)
# React数据流
React中的数据流是自顶向下单向流动的,也就是从父组件到子组件,state和props是React组件中非常重要的概念
# state
state用于管理组件内部状态,这些状态我们通过setState方法来进行改变,当状态改变的后组件会尝试重新渲染。
下面以一个简单的计数器为例:
import React, { Component } from 'react'

class Count extends Component {
  constructor(props) {
    super(props)
    this.state = {
      count: 0
    }
  }
  handleClick = () => {
    this.setState({
      count: this.state.count + 1
    })
  }

  render() {
    return <span onClick={this.handleClick}>{this.state.count}</span>
  }
}

ReactDOM.render(
  <Count/>,
  document.getElementById('app')
);
当我们点击文本时,会触发setState方法并更新state,使得组件重新渲染。
注意:一个生命周期内所有的 setState 方法会合并操作。
# props
props用于父子组件间通信,子组件内不能直接改变props的值,defaultProps静态变量可以定义props的默认值。在 React 中有一个重要且内置的 prop——children,它代表组件的子组件集合。如果顶层组件初始化 props,那么 React 会向下遍历整棵组件树,重新尝试渲染所有相关的子组件。
// ...

class Count extends Component {
  static defaultProps = {
    count: 0
  }
  render() {
    return <span>{this.props.count}</span>
  }
}

ReactDOM.render(
  <Count count={1}/>,
  document.getElementById('example')
);
# React生命周期
React生命周期在React 16进行了较大变更,这里我们以React 16为分界线简要介绍下React的生命周期。
# React 16 前的生命周期
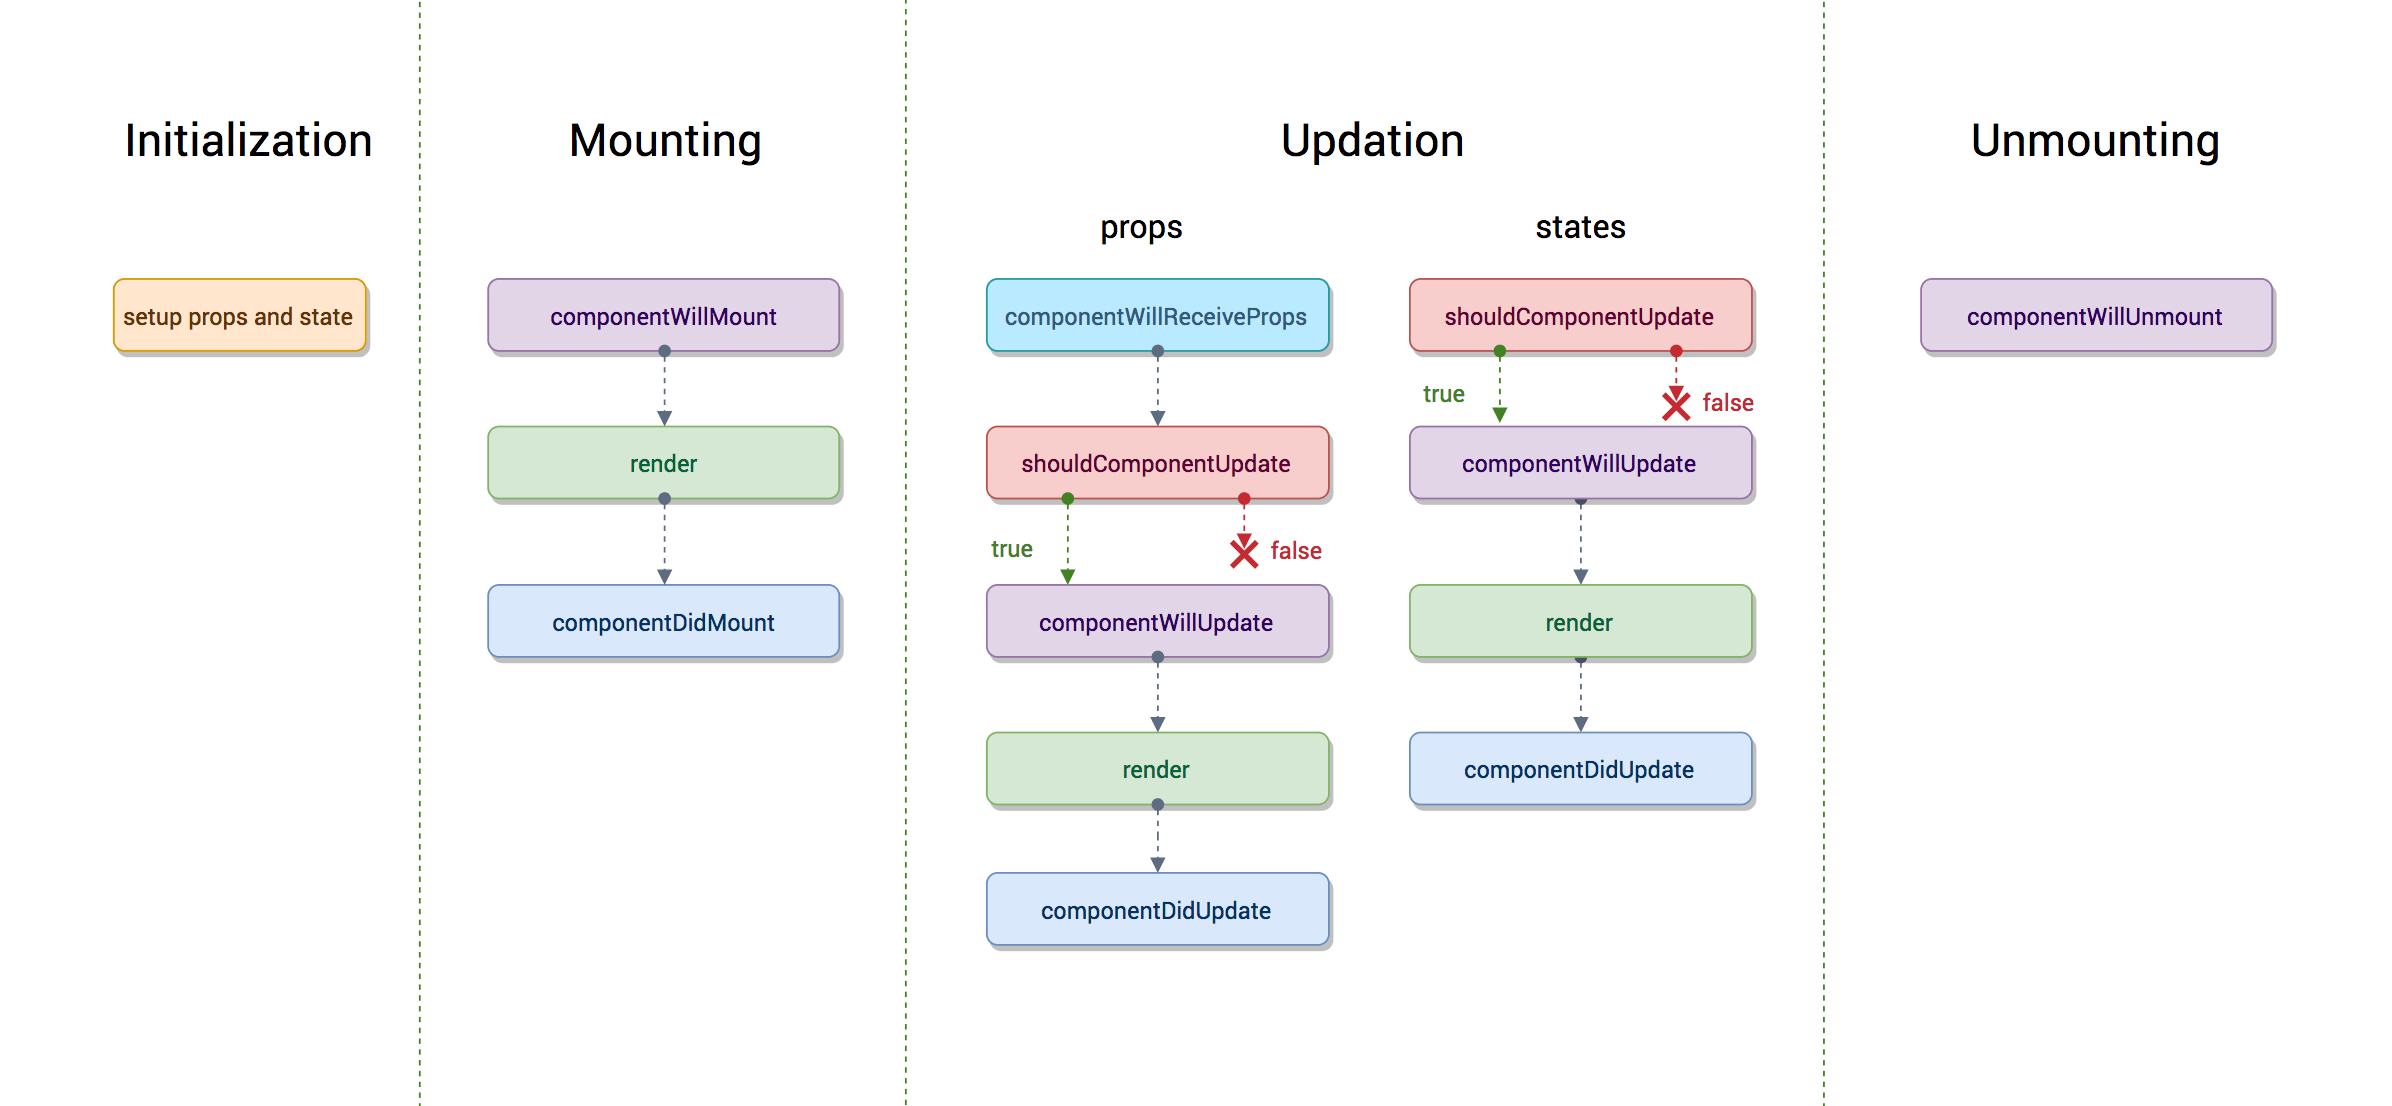
- 初始化阶段
constructor用来做一些组件初始化操作,比如初始化state
import React, { Component } from 'react'

class Count extends Component {
  constructor(props) {
    // 调用基类的构造函数并把基类的props注入到子组件
    super(props)
  }
}
- 挂载阶段
- componentWillMount
在组件挂在到DOM前调用且只调用一次
- render
render函数会插入jsx生成的dom结构,react会生成一份虚拟dom树,在每一次组件更新时,react会通过diff算法比较更新前后的新旧DOM树,找到最小的有差异的DOM节点,并重新渲染
- componentDidMount
组件挂载到DOM后调用且只调用一次
- 更新
如上图在Updation阶段触发更新的有两种情况,一种是组件的props改变了,一种是组件的state改变了。
在React中组件更新一般有两种情况:
(1) 父组件重新render导致子组件更新,如果此时我们并不想子组件也跟着更新,可以使用shouldComponentUpdate方法阻止子组件的更新。
class Count extends Component {
   shouldComponentUpdate(nextProps){
      if(nextProps.count === this.props.count){
        return false // 返回false阻止更新
      }
      return true
    }
    render() {
      return <div>{this.props.count}</div>
    }
}
如果Count组件中没有使用props,可以直接在shouldComponentUpdate返回false,阻止Count组件渲染。
(2) 组件内调用setState,无论state有没有变化都会引起组件的重新渲染,这时可以使用shouldComponentUpdate进行优化,只有state变化后组件才重新渲染。
class Count extends React.Component {
  constructor(props) {
    super(props)
    this.state = {
      count: 0
    }
  }
  shouldComponentUpdate(nextProps, nextState){
    if(nextState.count === this.state.count){ // 如果count的值没有发生变化,组件不重新渲染
      return false
    }
	  return true
  }
  handleClick = () => {
    this.setState({
      count: this.state.count
    })
  }

  render() {
    return <span onClick={this.handleClick}>{this.state.count}</span>
  }
}
- componentWillReceiveProps(nextProps)
如果组件是由父组件更新 props 而更新的,那么在 shouldComponentUpdate 之前会先执行 componentWillReceiveProps 方法。
在组件接收到一个新的 prop (更新后)时被调用,参数nextProps是父组件传给当前组件的新props,这个方法中需要对比nextProps和this.props,将nextProps的state做为当前组件的state,从而重新渲染组件
componentWillReceiveProps (nextProps) {
  nextProps.count !== this.props.count&&this.setState({
      count:nextProps.count
  })
}
- shouldComponentUpdate(nextProps, nextState)
返回一个布尔值。在组件接收到新的props或者state时被调用,返回true组件继续执行更新操作,返回false组件停止更新操作,可以用来减少组件的不必要渲染,优化性能。在初始化时或者使用forceUpdate时不被调用。
- componentWillUpdate (nextProps,nextState)
在组件接收到新的props或者state但还没有render时被调用。在初始化时不会被调用。
- render
render函数会插入jsx生成的dom结构,react会生成一份虚拟dom树,在每一次组件更新时,react会通过diff算法比较更新前后的新旧DOM树,找到最小的有差异的DOM节点,并重新渲染
- componentDidUpdate(prevProps,prevState)
在组件完成更新后立即调用。在初始化时不会被调用。
- 卸载
componentWillUnmount
在组件被卸载前调用,一般用于一些清理工作,如清理定时器、事件绑定等等,以免造成内存泄露。
# React 16.3后的组件生命周期
React16.3之后新增了两个新的生命周期函数。
- getDerivedStateFromProps 因为在React推出Fiber后之前的某些生命周期方法就不合适了,因为要开启async rendering,在render函数之前的所有函数,都有可能被执行多次。
随着getDerivedStateFromProps的推出,deprecate了一组生命周期API
(1) componentWillReceiveProps
(2)componentWillMount
(3)componentWillUpdate
除了shouldComponentUpdate之外,render之前的所有生命周期函数全灭。
getDerivedStateFromProps是一个静态函数,不能访问this。
static getDerivedStateFromProps(nextProps, prevState) {
  //根据nextProps和prevState计算出预期的状态改变,返回结果会被送给setState
}
- getSnapshotBeforeUpdate
这个函数在render之后执行,执行的时候DOM元素还没有更新,因此有机会去获取一个DOM信息,计算得到一个snapshot,这个snapshot会作为componentDidUpdate的第三个参数传入。
官方示例:
class ScrollingList extends React.Component {
  constructor(props) {
    super(props);
    this.listRef = React.createRef();
  }

  getSnapshotBeforeUpdate(prevProps, prevState) {
    // Are we adding new items to the list?
    // Capture the scroll position so we can adjust scroll later.
    if (prevProps.list.length < this.props.list.length) {
      const list = this.listRef.current;
      return list.scrollHeight - list.scrollTop;
    }
    return null;
  }

  componentDidUpdate(prevProps, prevState, snapshot) {
    // If we have a snapshot value, we've just added new items.
    // Adjust scroll so these new items don't push the old ones out of view.
    // (snapshot here is the value returned from getSnapshotBeforeUpdate)
    if (snapshot !== null) {
      const list = this.listRef.current;
      list.scrollTop = list.scrollHeight - snapshot;
    }
  }

  render() {
    return (
      <div ref={this.listRef}>{/* ...contents... */}</div>
    );
  }
}
React16.3生命周期图:
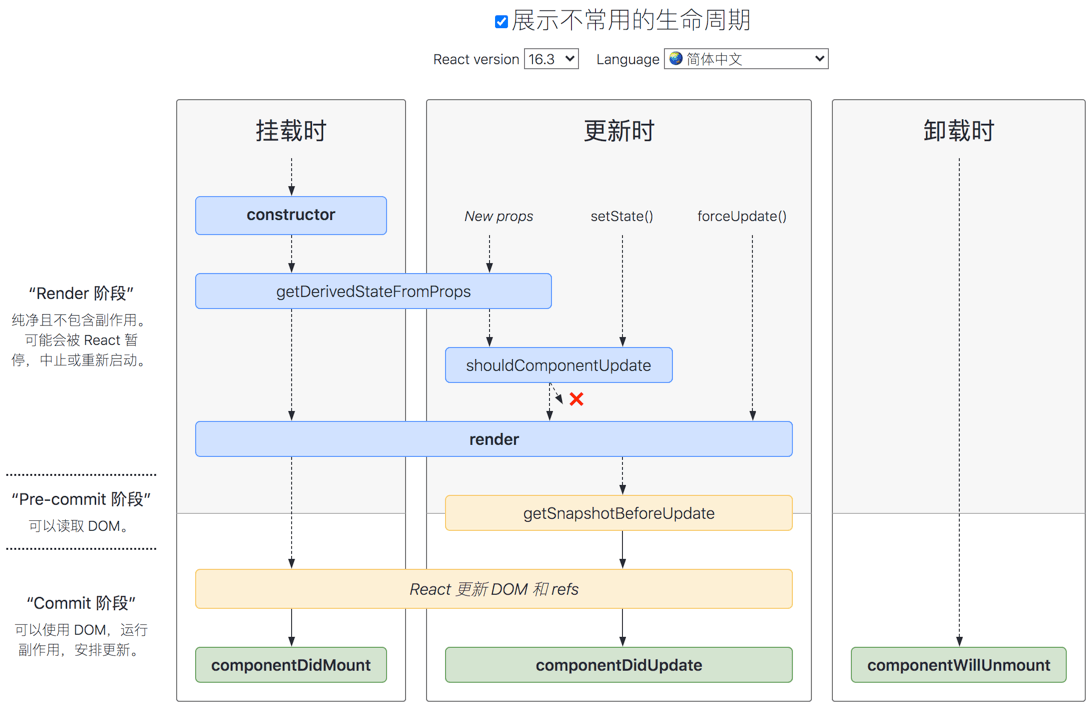
从图中可以看出,在Updating过程中,setState或者forceUpdate触发的更新不会调用getDerivedStateFromProps方法。
React 16.4版本对其进行了修改:
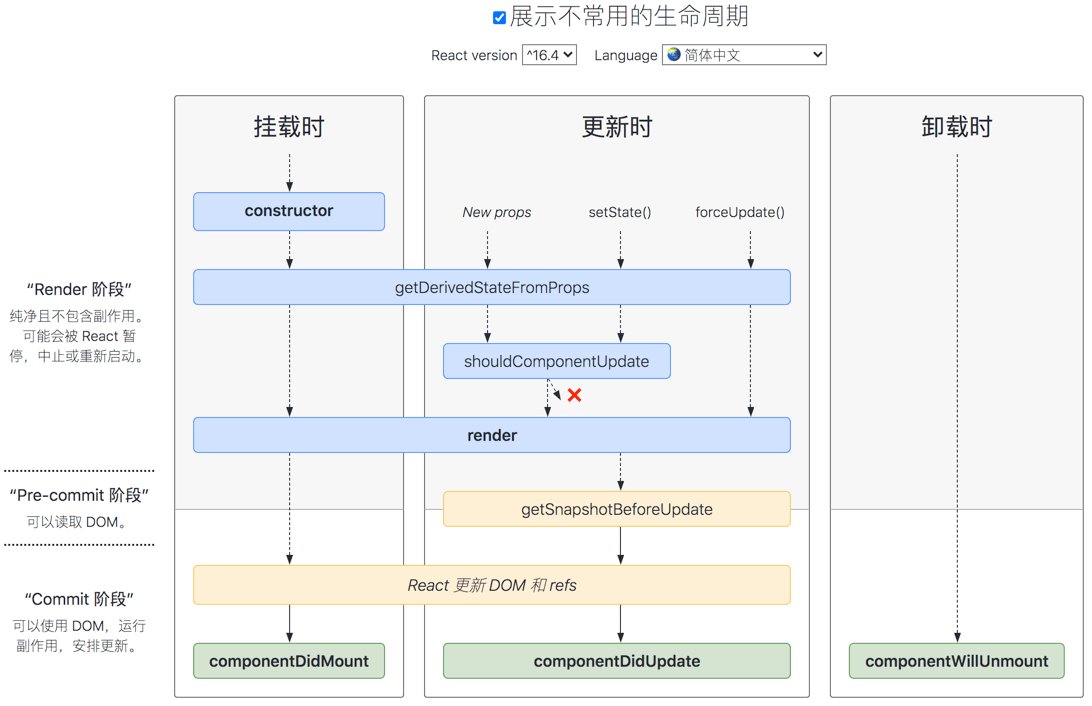
让getDerivedStateFromProps方法无论是Mounting还是Updating,无论是因为什么引起的Updating,全部都会被调用。
# React 与 DOM
react-dom的package提供了可在应用顶层使用的 DOM(DOM-specific)方法,如果有需要,你可以把这些方法用于 React 模型以外的地方。不过一般情况下,大部分组件都不需要使用这个模块。ReactDOM 的关注点在 DOM 上,因此只适用于 Web 端。在 React 组件的开发实现中,我们并不会用到 ReactDOM,只有在顶层组件以及由于 React 模型所限而不得不操作 DOM 的时候,才会使用它。
- findDOMNode
语法:ReactDOM.findDOMNode(component)
我们可以通过ReactDOM.findDOMNode方法获取到组件对应的已渲染的真实DOM元素。
import React, { Component } from 'react';
import ReactDOM from 'react-dom';

class App extends Component {
  componentDidMount() {
    // this 为当前组件的实例
    const dom = ReactDOM.findDOMNode(this);
  }

  render() {}
}
findDOMNode() 不能用在无状态组件上。在大多数情况下,不推荐使用该方法,因为它会破坏组件的抽象结构,严格模式下该方法已弃用。如果在开发中实在想获取真实DOM元素,可以尝试绑定一个 ref 到 DOM 节点上。
- render
语法:ReactDOM.render(element, container[, callback])
该方法把element挂载到container,并返回对该组件的引用。如果是无状态组件,render 会返回 null。当组件在初次渲染之后再次更新时,React 不会把整个组件重新渲染一次,而会用它高效的 DOM diff 算法做局部的更新。如果提供了可选的回调函数,该回调将在组件被渲染或更新之后被执行。
ReactDOM.render() 目前会返回对根组件 ReactComponent 实例的引用。 但是,目前应该避免使用返回的引用,因为它是历史遗留下来的内容,而且在未来版本的 React 中,组件渲染在某些情况下可能会是异步的。 如果你真的需要获得对根组件 ReactComponent 实例的引用,那么推荐为根元素添加 callback ref。
使用 ReactDOM.render() 对服务端渲染容器进行 hydrate 操作的方式已经被废弃,并且会在 React 17 被移除。作为替代,请使用 hydrate()。
- unmountComponentAtNode
语法:ReactDOM.unmountComponentAtNode(container)
作用:从 DOM 中卸载组件,会将其事件处理器(event handlers)和 state 一并清除。如果指定容器上没有对应已挂载的组件,这个函数什么也不会做。如果组件被移除将会返回 true,如果没有组件可被移除将会返回 false。
- createPortal
语法:ReactDOM.createPortal(child, container)
作用:创建 portal。Portal 将提供一种将子节点渲染到 DOM 节点中的方式,该节点存在于 DOM 组件的层次结构之外。
# Refs
在某些情况下如果需要操作真实DOM,React提供了Refs,允许我们访问 DOM 节点或在 render 方法中创建的 React 元素。
虽然React提供了直接操作DOM的方法,但是不可乱用,我们应该尽量避免使用 refs 来做任何可以通过声明式实现来完成的事情。
下面是几个适合使用 refs 的情况:
- 管理焦点,文本选择或媒体播放。
- 触发强制动画。
- 集成第三方 DOM 库。
在React16.3之前通过字符串或者回调函数的形式获取,在React 16.3中引入了React.createRef API。在React 16.8中引入了React.useRef API。
下面的代码简单列举了四种ref的使用方法:
// string ref
class MyComponent1 extends React.Component {
  componentDidMount() {
    this.refs.myRef.focus();
  }
  render() {
    return <input ref="myRef" />;
  }
}

// callback ref
class MyComponent2 extends React.Component {
  componentDidMount() {
    this.myRef.focus();
  }
  render() {
    return <input ref={(ele) => {
      this.myRef = ele;
    }} />;
  }
}

// React.createRef()
class MyComponent3 extends React.Component {
  constructor(props) {
    super(props);
    // 使用React.createRef()创建ref并绑定到一个实例属性上,以便可以在整个组件中使用
    this.myRef = React.createRef();
  }
  componentDidMount() {
    this.myRef.current.focus();
  }
  render() {
    // 通过ref 属性将创建的Refs添加到 React 元素上
    return <div ref={this.myRef} />;
  }
}

// React.useRef
function MyComponent4() {
  const myRef = React.useRef(null)
  return <span ref={myRef}>hello world</span>
}
React官方文档中已明确提出string ref这种方式会被移除,所以开发时不要再使用这中方式了。我们可能会疑惑为啥string ref这种形式被废弃了呢,从上面简单的例子来看,string ref也挺方便的呀。这是因为:
some issues (opens new window)
String refs are bad in quite a few ways (opens new window)
这个网站需要梯子,这里放下截图
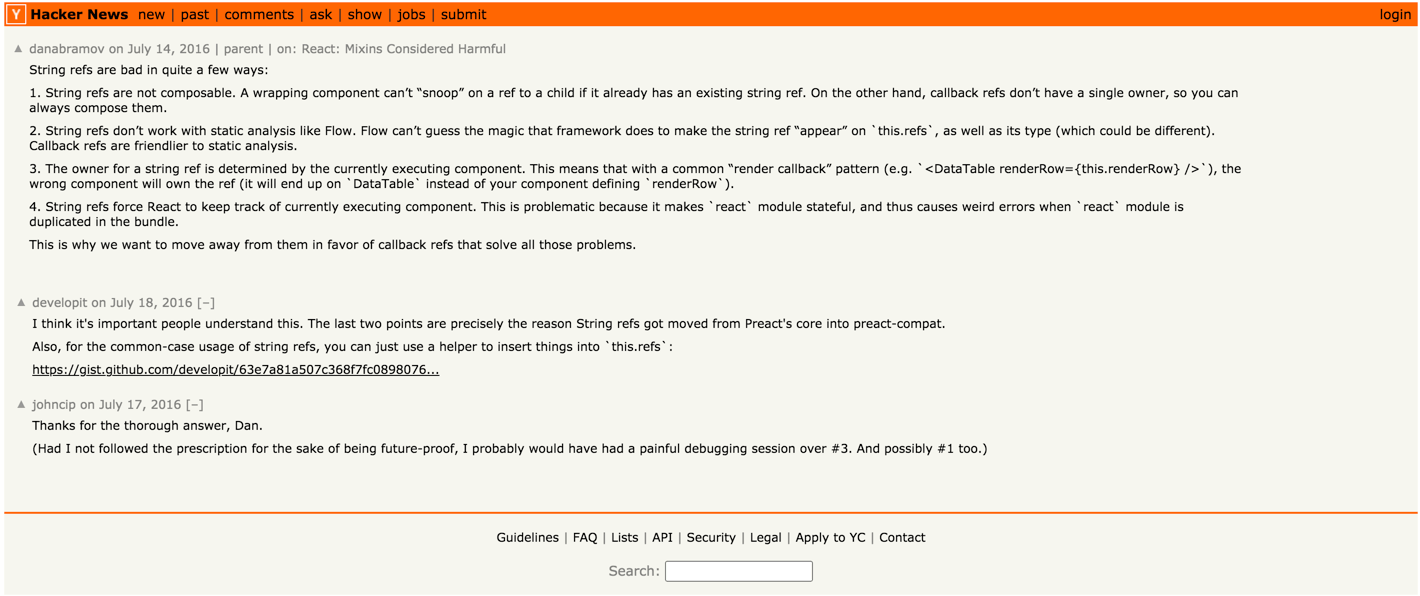
- string ref 无法被组合,例如一个第三方库的父组件已经给子组件传递了 ref,那么我们就无法再在子组件上添加 ref 了,而 callback ref 可完美解决此问题。
/** string ref **/
class Parent extends React.Component {
  componentDidMount() {
    // 可获取到 this.refs.childRef
    console.log(this.refs);
  }
  render() {
    return <input ref="childRef"/>
  }
}

class App extends React.Component {
  componentDidMount() {
    // this.refs.child 无法获取到
    console.log(this.refs);
  }
  render() {
    return (
      <Parent>
        <input ref="child" />
      </Parent>
    );
  }
}

/** callback ref **/
class Parent extends React.Component {
  componentDidMount() {
    // 可以获取到 child ref
    console.log('parent', this.childRef);
  }
  render() {
    const { children } = this.props;
    return <input ref={child=>{ this.childRef =child; children.ref && children.ref(child) }}/>
  }
}

class App extends React.Component {
  componentDidMount() {
    // 可以获取到 child ref
    console.log('app', this.child);
  }
  render() {
    return (
      <Parent>
        <input ref={(child) => {
          this.child = child;
        }} />
      </Parent>
    );
  }
}
- string ref 不适用于Flow之类的静态分析。 Flow不能猜测框架可以使字符串ref“出现”在react上的神奇效果,以及它的类型(可能有所不同)。 回调引用比静态分析更友好。
- 字符串ref的所有者由当前执行的组件确定。这意味着,使用常见的“渲染回调”模式(e.g.
<DataTable renderRow={this.renderRow} />),错误的组件将拥有ref(它将在DataTable上结束,而不是你定义的组件renderRow)。
class MyComponent extends Component {
  renderRow = (index) => {
    // string ref 会挂载在 DataTable this 上
    return <input ref={'input-' + index} />;

    // callback ref 会挂载在 MyComponent this 上
    return <input ref={input => this['input-' + index] = input} />;
  }

  render() {
    return <DataTable data={this.props.data} renderRow={this.renderRow} />
  }
}
- string ref 强制React跟踪当前正在执行的组件。 这是有问题的,因为它使react模块处于有状态,并在捆绑中复制react模块时导致奇怪的错误。在 reconciliation 阶段,React Element 创建和更新的过程中,ref 会被封装为一个闭包函数,等待 commit 阶段被执行,这会对 React 的性能产生一些影响。
function coerceRef(
  returnFiber: Fiber,
  current: Fiber | null,
  element: ReactElement,
) {
  ...
  const stringRef = '' + element.ref;
  // 从 fiber 中得到实例
  let inst = ownerFiber.stateNode;

  // ref 闭包函数
  const ref = function(value) {
    const refs = inst.refs === emptyObject ? (inst.refs = {}) : inst.refs;
    if (value === null) {
      delete refs[stringRef];
    } else {
      refs[stringRef] = value;
    }
  };
  ref._stringRef = stringRef;
  return ref;
  ...
}
- 在根组件上使用无法生效。
ReactDOM.render(<App ref="app" />, document.getElementById('main'));
- 对于静态类型较不友好,当使用 string ref 时,必须显式声明 refs 的类型,无法完成自动推导。
- 编译器无法将 string ref 与其 refs 上对应的属性进行混淆,而使用 callback ref,可被混淆。
/** string ref,无法混淆 */
this.refs.myRef
<div ref="myRef"></div>

/** callback ref, 可以混淆 */
this.myRef
<div ref={(dom) => { this.myRef = dom; }}></div>

this.r
<div ref={(e) => { this.r = e; }}></div>
我们再来看下createRef 和 callback ref,从语义上来看createRef更直观一些且如果 ref 回调函数是以内联函数的方式定义的,在更新过程中它会被执行两次,第一次传入参数 null,然后第二次会传入参数 DOM 元素。这是因为在每次渲染时会创建一个新的函数实例,所以 React 清空旧的 ref 并且设置新的。通过将 ref 的回调函数定义成 class 的绑定函数的方式可以避免上述问题,但是大多数情况下它是无关紧要的。
ref 回调函数以内联函数的方式定义:
class Count extends React.Component {
  constructor(props) {
    super(props)
    this.state = {
      count: 0
    }
  }

  handleClick = () => {
    this.setState({
      count: this.state.count + 1
    })
  }

  render() {
    return (
      <span ref={
        ele => {
          this.spanRef = ele
          // ref 回调函数是以内联函数的方式定义的,在更新过程中它会被执行两次
          console.log('执行了')
        }
      }
        onClick={this.handleClick}
      >
        {this.state.count}
      </span>
    )
  }
}

ReactDOM.render(
  <Count />,
  document.getElementById('example')
);
ref 的回调函数定义为class 的绑定函数:
class Count extends React.Component {
  constructor(props) {
    super(props)
    this.state = {
      count: 0
    }
    this.setSpanRef = ele => {
      this.spanRef = ele
      console.log('执行了');
    }
  }

  handleClick = () => {
    this.setState({
      count: this.state.count + 1
    })
  }

  render() {
    return (
      <span
      // ref 的回调函数定义成 class 的绑定函数时,只执行一次
        ref={this.setSpanRef}
        onClick={this.handleClick}
      >
        {this.state.count}
      </span>
    )
  }
}

ReactDOM.render(
  <Count />,
  document.getElementById('example')
);
上面我们简单列举了下四种创建ref的方式和些许区别。下面我们
# 访问Refs
当 ref 被传递给 render 中的元素时,对该节点的引用可以在 ref 的 current 属性中被访问。
const node = this.myRef.current;
默认不能在函数组件上使用ref属性,因为没有实例。
function DangerousTip() {
  return <span ref="3">禁止触碰!!!</span>
}

class App extends React.Component {
  constructor(props) {
    super(props)
    this.myRef = React.createRef()
  }
  render() {
    // Warning: Function components cannot be given refs. Attempts to access this ref will fail. Did you mean to use React.forwardRef()?
    return <DangerousTip ref={this.myRef}/>
  }
}

ReactDOM.render(
  <App />,
  document.getElementById('example')
);
如果非想在函数组件上使用ref可以使用forwardRef
我们可以通过React.useRef()在函数组件内部使用ref属性了只要它指向一个 DOM 元素或 class 组件
<!DOCTYPE html>
<html>
  <head>
    <meta charset="UTF-8" />
    <title>Hello World</title>
    <script src="https://unpkg.com/react@17/umd/react.development.js"></script>
    <script src="https://unpkg.com/react-dom@17/umd/react-dom.development.js"></script>

    <!-- Don't use this in production: -->
    <script src="https://unpkg.com/@babel/standalone/babel.min.js"></script>
  </head>
  <body>
    <div id="root"></div>
    <script type="text/babel">
      const { useRef } = React
      const { render } = ReactDOM

      function DangerousTip() {
        const myRef = useRef(null)
        const printContent = () => console.log(myRef.current.innerText)
        return <span ref={myRef} onClick={printContent}>禁止触摸!!!</span>
      }

      class App extends React.Component {
        render() {
          return <DangerousTip/>
        }
      }

      render(
        <App/>,
        document.getElementById('root')
      );

    </script>
  </body>
</html>
我们不能在类组件中使用useRef创建ref
<!DOCTYPE html>
<html>
  <head>
    <meta charset="UTF-8" />
    <title>Hello World</title>
    <script src="https://unpkg.com/react@17/umd/react.development.js"></script>
    <script src="https://unpkg.com/react-dom@17/umd/react-dom.development.js"></script>

    <!-- Don't use this in production: -->
    <script src="https://unpkg.com/@babel/standalone/babel.min.js"></script>
  </head>
  <body>
    <div id="root"></div>
    <script type="text/babel">
      const { useRef } = React
      const { render } = ReactDOM

      class App extends React.Component {
        constructor(props) {
          super(props)
          this.myRef = useRef()
        }
        render() {
          // Invalid hook call. Hooks can only be called inside of the body of a function component.
          return <input ref={this.myRef}/>
        }
      }

      render(
        <App/>,
        document.getElementById('root')
      );

    </script>
  </body>
</html>
# React.forwardRef
在某些情况下可能会希望父组件能引用子组件的DOM节点,这个使用可以使用Refs 转发。Ref 转发是一项将 ref 自动地通过组件传递到其一子组件的技巧。对于大多数应用中的组件来说,这通常不是必需的。
我们可以通过React.forwardRef 来获取传递给它的 ref。下面是一个简单的实例,点击APP组件中的button在控制台打印出input中输出的内容
<!DOCTYPE html>
<html>
  <head>
    <meta charset="UTF-8" />
    <title>Hello React</title>
    <script src="https://unpkg.com/react@17/umd/react.development.js"></script>
    <script src="https://unpkg.com/react-dom@17/umd/react-dom.development.js"></script>

    <!-- Don't use this in production: -->
    <script src="https://unpkg.com/@babel/standalone/babel.min.js"></script>
  </head>
  <body>
    <div id="root"></div>
    <script type="text/babel">
      const { useRef, forwardRef, createRef } = React
      const { render } = ReactDOM

      const Input = forwardRef((props, ref)=><input ref={ref} />)

      function App() {
        // const inputRef = useRef(null)
        const inputRef = createRef()
        const print = () => console.log(inputRef.current.value)

        return (
          <div>
            评价:<Input ref={inputRef}/>
            <button onClick={print}>提交</button>
          </div>
        )
      }
      render(
        <App/>,
        document.getElementById('root')
      );

    </script>
  </body>
</html>
简要描述下步骤:
- 我们通过调用 React.useRef 创建了一个 React ref 并将其赋值给 inputRef 变量。
- 我们通过指定 ref 为 JSX 属性,将其向下传递给
<Input ref={ref}>。 - React 传递 ref 给 forwardRef 内函数 (props, ref) => ...,作为其第二个参数。
- 我们向下转发该 ref 参数到
<input ref={ref}/>,将其指定为 JSX 属性。 - 当 ref 挂载完成,ref.current 将指向
<input>DOM 节点。
注意
第二个参数 ref 只在使用 React.forwardRef 定义组件时存在。常规函数和 class 组件不接收 ref 参数,且 props 中也不存在 ref。
Ref 转发不仅限于 DOM 组件,你也可以转发 refs 到 class 组件实例中。
可能你会问,如果我使用的是低版本的react,不支持React.forwardRef怎么办呢?可以使用 ref 作为特殊名字的 prop 直接传递。
<!DOCTYPE html>
<html>
  <head>
    <meta charset="UTF-8" />
    <title>Hello React</title>
    <script src="https://unpkg.com/react@17/umd/react.development.js"></script>
    <script src="https://unpkg.com/react-dom@17/umd/react-dom.development.js"></script>

    <!-- Don't use this in production: -->
    <script src="https://unpkg.com/@babel/standalone/babel.min.js"></script>
  </head>
  <body>
    <div id="root"></div>
    <script type="text/babel">
      const { useRef, forwardRef, createRef } = React
      const { render } = ReactDOM

      function Input(props) {
        return <input ref={props.inputRef}/>
      }
      function App() {
        // const inputRef = useRef(null)
        const inputRef = createRef()
        const onSubmit = () => console.log(inputRef.current.value)

        return (
          <div>
            评价:<Input inputRef={inputRef}/>
            <button onClick={onSubmit}>提交</button>
          </div>
        )
      }
      render(
        <App/>,
        document.getElementById('root')
      );

    </script>
  </body>
</html>
当然React.forwardRef还可以用于高阶组件中,这里不再赘述,请参考官方文档 Forwarding Refs (opens new window)。
# React.createRef vs React.useRef
细心的读者可能会发现在上面代码App中我们分别使用React.createRef和React.useRef两种方式创建了ref,都能实现我们想要的效果。那么它俩有什么区别呢?
- useRef不能用在类组件中,如下代码会报错:
class App extends Component {
  constructor(props) {
    super(props)
    // Invalid hook call. Hooks can only be called inside of the body of a function component.
    this.valRef = useRef()
  }
  render() {
    return null
  }
}
- useRef除了可以用于ref属性,它还可以保存任何可变值,类似于一个 class 的实例属性,并且可以通过参数传入初始值createRef则不可以传默认值。
function App() {
  const [, setCount] = useState()
  let count = useRef(0)
  const handleClick = () => {
    count.current += 1
    setCount({})
  }
  return <span onClick={handleClick}>{count.current}</span>
}
- useRef 会在每次渲染时返回同一个 ref 对象,它将会在函数组件的生命周期中,保持状态不变,除非手动进行修改,createRef创建的值会随着函数组件渲染时重复执行而不断被初始化。
当我们将上例中的useRef换成createRef再点击span标签,控制台输出的是null,这是怎么回事呢?
function App() {
  const [, setCount] = useState()
  let count = createRef()
  const handleClick = () => {
    console.log(count);
    count.current += 1
    setCount({})
  }
  return <span onClick={handleClick}>123{count.current}</span>
}
这是因为App组件是函数组件,每次渲染、更新时都要将App函数从头到尾执行一遍,createRef返回的值每次都是{current: null}。createRef能在类组件中使用是因为类组件中有明确的生命周期钩子函数,组件渲染时不会不会将类中所有的变量、方法都重新执行、初始化。
- 当 ref 对象内容发生变化时,useRef 并不会通知你。变更 .current 属性不会引发组件重新渲染。如果想要在 React 绑定或解绑 DOM 节点的 ref 时运行某些代码,则需要使用回调 ref 来实现。
参考:
函数式组件与类组件有何不同? (opens new window)
分析React.createRef和React.useRef (opens new window)
React Ref 原来是这样的 (opens new window)
React ref 的前世今生 (opens new window)
React生命周期网址 (opens new window)
React生命周期项目github地址 (opens new window)
漫谈React →