# JSX本质是什么
React.createElement,返回vnode,第一个参数可能是组件,也可能是html tag,组件名首字母必须大
下面列举几个简单的示例:
const imgElem = <div id="div1">
    <p>some text</p>
    <img src={imgUrl}/>
</div>
// 编译后
var imgElem = /*#__PURE__*/React.createElement("div", {
  id: "div1"
}, /*#__PURE__*/React.createElement("p", null, "some text"), /*#__PURE__*/React.createElement("img", {
  src: imgUrl
}));


const styleData = { fontSize: '30px',  color: 'blue' }
const styleElem = <p style={styleData}>设置 style</p>
// 编译后
var styleData = {
  fontSize: '30px',
  color: 'blue'
};
var styleElem = /*#__PURE__*/React.createElement("p", {
  style: styleData
}, "\u8BBE\u7F6E style");


const app = <div>
    <Input submitTitle={onSubmitTitle}/>
    <List list={list}/>
</div>
// 编译后
var app = /*#__PURE__*/React.createElement("div", null, /*#__PURE__*/React.createElement(Input, {
  submitTitle: onSubmitTitle
}), /*#__PURE__*/React.createElement(List, {
  list: list
}));


const eventList = <p onClick={this.clickHandler}>
    some text
</p>
// 编译后
var eventList = /*#__PURE__*/React.createElement("p", {
  onClick: (void 0).clickHandler
}, "some text");


const listElem = <ul>{this.state.list.map((item, index) => {
    return <li key={item.id}>index {index}; title {item.title}</li>
})}</ul>
// 编译后
var listElem = /*#__PURE__*/React.createElement("ul", null, (void 0).state.list.map(function (item, index) {
  return /*#__PURE__*/React.createElement("li", {
    key: item.id
  }, "index ", index, "; title ", item.title);
}));
# React的合成事件机制
所有事件挂载到document上,event不是原生的,是SyntheticEvent合成事件对象和Vue事件不同和DOM事件也不同。
import React from 'react'

class EventDemo extends React.Component {
    constructor(props) {
        super(props)
        this.state = {
            name: 'zhangsan',
            list: [
                {
                    id: 'id-1',
                    title: '标题1'
                },
                {
                    id: 'id-2',
                    title: '标题2'
                },
                {
                    id: 'id-3',
                    title: '标题3'
                }
            ]
        }

        // 修改方法的 this 指向
        this.clickHandler1 = this.clickHandler1.bind(this)
    }
    render() {
        // // this - 使用 bind
        // return <p onClick={this.clickHandler1}>
        //     {this.state.name}
        // </p>

        // // this - 使用静态方法
        // return <p onClick={this.clickHandler2}>
        //     clickHandler2 {this.state.name}
        // </p>

        // // event
        // return <a href="https://imooc.com/" onClick={this.clickHandler3}>
        //     click me
        // </a>

        // 传递参数 - 用 bind(this, a, b)
        return <ul>{this.state.list.map((item, index) => {
            return <li key={item.id} onClick={this.clickHandler4.bind(this, item.id, item.title)}>
                index {index}; title {item.title}
            </li>
        })}</ul>
    }
    clickHandler1() {
        // console.log('this....', this) // this 默认是 undefined
        this.setState({
            name: 'lisi'
        })
    }
    // 静态方法,this 指向当前实例
    clickHandler2 = () => {
        this.setState({
            name: 'lisi'
        })
    }
    // 获取 event
    clickHandler3 = (event) => {
        event.preventDefault() // 阻止默认行为
        event.stopPropagation() // 阻止冒泡
        console.log('target', event.target) // 指向当前元素,即当前元素触发
        console.log('current target', event.currentTarget) // 指向当前元素,假象!!!

        // 注意,event 其实是 React 封装的。可以看 __proto__.constructor 是 SyntheticEvent 组合事件
        console.log('event', event) // 不是原生的 Event ,原生的 MouseEvent
        console.log('event.__proto__.constructor', event.__proto__.constructor)

        // 原生 event 如下。其 __proto__.constructor 是 MouseEvent
        console.log('nativeEvent', event.nativeEvent)
        console.log('nativeEvent target', event.nativeEvent.target)  // 指向当前元素,即当前元素触发
        console.log('nativeEvent current target', event.nativeEvent.currentTarget) // 指向 document !!!

        // 1. event 是 SyntheticEvent ,模拟出来 DOM 事件所有能力
        // 2. event.nativeEvent 是原生事件对象
        // 3. 所有的事件,都被挂载到 document 上
        // 4. 和 DOM 事件不一样,和 Vue 事件也不一样
    }
    // 传递参数
    clickHandler4(id, title, event) {
        console.log(id, title)
        console.log('event', event) // 最后追加一个参数,即可接收 event
    }
}

export default EventDemo
为什么使用事件合成机制呢?
- 为了更好的兼容性和跨平台
- 挂载到document上减少内存消耗,避免频繁解绑,事件挂载越多内存消耗越多
- 方便事件的统一管理
# setState和batchUpdate机制
有时异步(普通使用),有时同步(setTimeout、DOM事件)
有时合并(对象形式),有时不合并(函数形式)
示例:
import React from 'react'

// 函数组件(后面会讲),默认没有 state
class StateDemo extends React.Component {
    constructor(props) {
        super(props)

        // 第一,state 要在构造函数中定义
        this.state = {
            count: 0
        }
    }
    render() {
        return <div>
            <p>{this.state.count}</p>
            <button onClick={this.increase}>累加</button>
        </div>
    }
    increase = () => {
        // // 第二,不要直接修改 state ,使用不可变值 ----------------------------
        // // this.state.count++ // 错误
        // this.setState({
        //     count: this.state.count + 1 // SCU
        // })
        // 操作数组、对象的的常用形式

        // 第三,setState 可能是异步更新(有可能是同步更新) ----------------------------

        // this.setState({
        //     count: this.state.count + 1
        // }, () => {
        //     // 联想 Vue $nextTick - DOM
        //     console.log('count by callback', this.state.count) // 回调函数中可以拿到最新的 state
        // })
        // console.log('count', this.state.count) // 异步的,拿不到最新值

        // // setTimeout 中 setState 是同步的
        // setTimeout(() => {
        //     this.setState({
        //         count: this.state.count + 1
        //     })
        //     console.log('count in setTimeout', this.state.count)
        // }, 0)

        // 自己定义的 DOM 事件,setState 是同步的。再 componentDidMount 中

        // 第四,state 异步更新的话,更新前会被合并 ----------------------------

        // // 传入对象,会被合并(类似 Object.assign )。执行结果只一次 +1
        // this.setState({
        //     count: this.state.count + 1
        // })
        // this.setState({
        //     count: this.state.count + 1
        // })
        // this.setState({
        //     count: this.state.count + 1
        // })

        // 传入函数,不会被合并。执行结果是 +3
        this.setState((prevState, props) => {
            return {
                count: prevState.count + 1
            }
        })
        this.setState((prevState, props) => {
            return {
                count: prevState.count + 1
            }
        })
        this.setState((prevState, props) => {
            return {
                count: prevState.count + 1
            }
        })
    }
    // bodyClickHandler = () => {
    //     this.setState({
    //         count: this.state.count + 1
    //     })
    //     console.log('count in body event', this.state.count)
    // }
    // componentDidMount() {
    //     // 自己定义的 DOM 事件,setState 是同步的
    //     document.body.addEventListener('click', this.bodyClickHandler)
    // }
    // componentWillUnmount() {
    //     // 及时销毁自定义 DOM 事件
    //     document.body.removeEventListener('click', this.bodyClickHandler)
    //     // clearTimeout
    // }
}

export default StateDemo

// -------------------------- 我是分割线 -----------------------------

// // 不可变值(函数式编程,纯函数) - 数组
// const list5Copy = this.state.list5.slice()
// list5Copy.splice(2, 0, 'a') // 中间插入/删除
// this.setState({
//     list1: this.state.list1.concat(100), // 追加
//     list2: [...this.state.list2, 100], // 追加
//     list3: this.state.list3.slice(0, 3), // 截取
//     list4: this.state.list4.filter(item => item > 100), // 筛选
//     list5: list5Copy // 其他操作
// })
// // 注意,不能直接对 this.state.list 进行 push pop splice 等,这样违反不可变值

// // 不可变值 - 对象
// this.setState({
//     obj1: Object.assign({}, this.state.obj1, {a: 100}),
//     obj2: {...this.state.obj2, a: 100}
// })
// // 注意,不能直接对 this.state.obj 进行属性设置,这样违反不可变值
setState主流程图
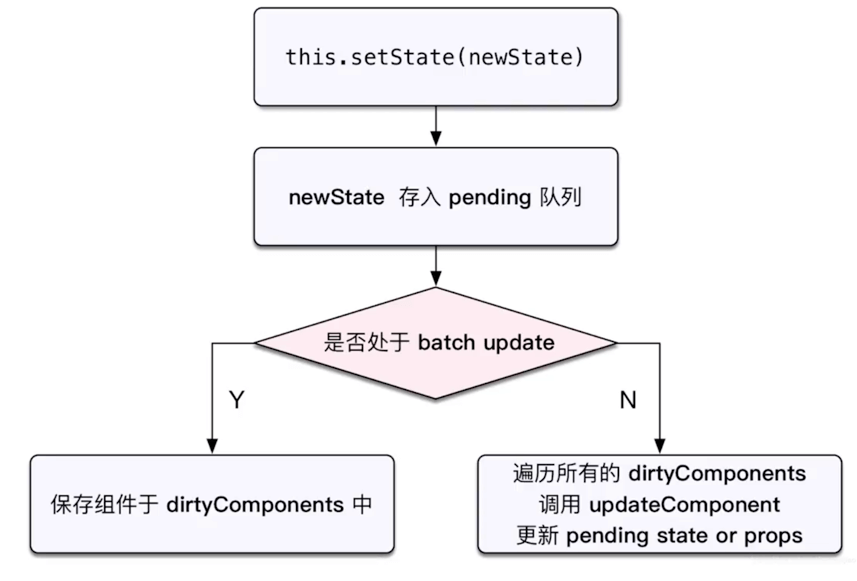
React在函数执行时会设置一个isBatchingUpdates变量,注意下面代码中的isBatchingUpdates只是一个示意并不是真的会在函数中设置isBatchingUpdates,这个值是在React入口层面的设置的,这里只是为了简单说明下
// 生命周期中
componentDidMount() {
  // isBatchingUpdates = true
  document.body.addEventListener('click', () => {
    // 当函数触发时 isBatchingUpdates已经是false了
  })
  // isBatchingUpdates = false
}

// React中注册的事件
handleClick1 = () => {
  // isBatchingUpdates = true
  this.setState({
    count: 1
  })
  // isBatchingUpdates = false
}

handleClick2 = () => {
  // isBatchingUpdates = true
  setTimeout(() => {
    // 执行时isBatchingUpdates已经是false了
    this.setState({
      count: 1
    }, 1000)
  })
  // isBatchingUpdates = false
}
综上,setState无所谓异步还是同步,主要看是否命中batchUpdate机制,依据就是判断isBatchingUpdates的值
# React事务机制
# React组件渲染和更新的过程
# React-fiber如何优化性能
在React15中,每次更新时,都是从根组件或setState后的组件开始,更新整个子树,我们唯一能做的是,在某个节点中使用SCU断开某一部分的更新,或者是优化SCU的比较效率。
React16则是需要将虚拟DOM转换为Fiber节点,首先它规定一个时间段内,然后在这个时间段能转换多少个FiberNode,就更新多少个。
更新逻辑分成两个阶段,第一个阶段是将虚拟DOM转换成Fiber, Fiber转换成组件实例或真实DOM(不插入DOM树,插入DOM树会reflow)
参考